说明:(重要)
WordPress子比主题是很多人喜欢的一款主题,该主题美化程度还是比较好的,但还是有很多人喜欢能更自由话,能做更多的美化效果,今天给大家分享一下网络收集的一些美化教程。
↓↓↓↓↓↓↓↓↓↓不会添加代码的看下面↓↓↓↓↓↓↓↓↓
(最新版)CSS代码添加到后台子比主题设置—>自定义代码—>自定义CSS样式
(最新版)JS即javascript代码添加到后台子比主题设置—>自定义代码—>自定义javascript代码
(最新版)没有特殊说明的小工具,自定义HTML小工具添加网站后台—>外观–>小工具–>点击【自定义HTML】选择放置的位置—>把代码复制进去,保存即可。
↑↑↑↑↑↑↑↑↑↑↑不会添加代码的看上面↑↑↑↑↑↑↑↑↑↑
其他添加方式的,我会在教程里告知,若只需添加CSS+JS的教程,我可能不重复告知了,请注意看上面的方法。
1.wordPress 好看的动态时钟小工具
使用教程
下载JS文件上传至服务器根目录(注意JS文件路径)
将下面代码复制至外观→小工具→自定义HTML文本中
代码:
<div class="card-content">
<canvas id="canvas" style="width:100%;" width="820" height="250"></canvas>
<script src="/clock.js"></script>
</div>
插件下载地址
2.网站添加“富强·民主·爱国”鼠标点击特效美化
部署到自己的网站非常的简单,几乎是支持所有的站点,一般情况下只要将复制好的代码粘贴到</body>之前就行了。如果是WordPress网站直接添加到footer.php文件的</body>之前就OK了。代码中的字体以及属性均可以自定义设置,因为上面附上另种不同效果的代码,大家选一个喜欢的给自己的网站装饰下看看效果吧!如果添加后未生效请尝试清理CDN缓存或者浏览器缓存就可以了。
 PHP
PHP<script type="text/javascript">
var a_idx = 0;
jquery(document).ready(function($) {
$("body").click(function(e) {
var a = new Array("富强", "民主", "文明", "和谐", "自由", "平等", "公正" ,"法治", "爱国", "敬业", "诚信", "友善");
var $i = $("<span/>").text(a[a_idx]);
a_idx = (a_idx + 1) % a.length;
var x = e.pageX,
y = e.pageY;
$i.css({
"z-index": 999999999999999999999999999999999999999999999999999999999999999999999,
"top": y - 20,
"left": x,
"position": "absolute",
"font-weight": "bold",
"color": "#ff6651"
});
$("body").append($i);
$i.animate({
"top": y - 180,
"opacity": 0
},
1500,
function() {
$i.remove();
});
});
});
</script>3.WordPress添加FPS帧率显示
你只需在网站管理后台—》主题设置—》自定义代码—》自定义javascript代码,把下面的js代码复制粘贴到里面即可。
 JavaScript
// FPS帧
$('body').before('<div id="fps" style="z-index:10000;position:fixed;top:3;left:3;font-weight:bold;"></div>');
var showFPS = (function(){
var requestAnimationFrame =
window.requestAnimationFrame ||
window.webkitRequestAnimationFrame ||
window.mozRequestAnimationFrame ||
window.oRequestAnimationFrame ||
window.msRequestAnimationFrame ||
function(callback) {
window.setTimeout(callback, 1000/60);
};
var e,pe,pid,fps,last,offset,step,appendFps;


fps = 0;
last = Date.now();
step = function(){
offset = Date.now() - last;
fps += 1;
if( offset >= 1000 ){
last += offset;
appendFps(fps);
fps = 0;
}
requestAnimationFrame( step );
};
appendFps = function(fps){
console.log(fps+'FPS');
$('#fps').html(fps+'FPS');
};
step();
})();4.整站底部添加好看的蓝色波浪
在 zibll 主题目录下,themes/zibll/footer.php 文件中的“</footer>”(重要)下面添加下面的代码:
 PHP
PHP<!--底部波浪开始-->
<div class="wiiuii_layout">
<svg class="editorial"
xmlns="http://www.w3.org/2000/svg"
xmlns:xlink="http://www.w3.org/1999/xlink"
viewBox="0 24 150 28"
preserveAspectRatio="none">
<defs>
<path id="gentle-wave"
d="M-160 44c30 0
58-18 88-18s
58 18 88 18
58-18 88-18
58 18 88 18
v44h-352z" />
</defs>
<g class="parallax">
<use xlink:href="#gentle-wave" x="50" y="0" fill="#4579e2"/>
<use xlink:href="#gentle-wave" x="50" y="3" fill="#3461c1"/>
<use xlink:href="#gentle-wave" x="50" y="6" fill="#2d55aa"/>
</g>
</svg>
</div>
<style type='text/css'>
.parallax > use{animation: move-forever 12s linear infinite;}.parallax > use:nth-child(1){animation-delay: -2s;}.parallax > use:nth-child(2){animation-delay: -2s; animation-duration: 5s;}.parallax > use:nth-child(3){animation-delay: -4s; animation-duration: 3s;}@keyframes move-forever{0%{transform: translate(-90px, 0%);} 100%{transform: translate(85px, 0%);}}.wiiuii_layout{width: 100%;height: 40px;position: relative;overflow: hidden;z-index: 1;background: var(--footer-bg);}.editorial{display: block; width: 100%; height: 40px; margin: 0;}
</style>
<!--底部波浪结束-->5.网站动态标题
JS代码:
 JavaScript
<!--浏览器搞笑标题-->
 var OriginTitle = document.title;
 var titleTime;
 document.addEventListener('visibilitychange', function () {
     if (document.hidden) {
         $('[rel="icon"]').attr('href', "https://pic.downk.cc/item/5fbd2ad6b18d6271135414f9.png");
         document.title = '我相信你还会回来的!';
         clearTimeout(titleTime);
     }
     else {
         $('[rel="icon"]').attr('href', "https://pic.downk.cc/item/5fbd2ad6b18d6271135414f9.png");
         document.title = '哈哈,我就知道!' ;
         titleTime = setTimeout(function () {
             document.title = OriginTitle;
         }, 2000);
     }
});6.主页底部炫酷引导小卡片
在后台—外观—小工具—首页-底部全宽度,自定义HTML添加下面代码即可。(其他位置自行修改~)
 Markup
<div id="wiiuii" style="box-shadow: 0 0 10px var(--main-shadow);">
<section class="buy-container">
  <div class="buy-box">
    <div class="slogan">
      <h3>博客</h3>
      <p>欢迎光临!</p>
    </div>
    <ul class="actions">
      <li>
        <a href="http://wpa.qq.com/msgrd?v=3&uin=QQ号&site=qq&menu=yes" target="_blank" class="buy-button primary" rel="noopener noreferrer">联系站长</a>
      </li>
      <li>
        <a href="https://www.itzhiyin.cn/links" target="_blank" class="demo-button" rel="noopener noreferrer">友链通道</a>
      </li>
    </ul>
  </div>
  <span class="tips"><div id="go-fav">更多精彩文章,按<span>Ctrl</span>+<span>D</span>收藏本站!</div></span>
  </section>
  </div>
<style type="text/css">
.buy-container{color: #ccc; padding: 60px 40px 50px 40px;margin: 0 auto; background: rgb(224,32,140); /*下述两行代码为兼容浏览器用,建议同步修改,亦可删除(不建议)*/background: -moz-linear-gradient(left, rgb(160,32,240) 0%, rgb(0,191,255) 100%);background: -webkit-linear-gradient(left, rgb(160,32,240) 0%,rgb(0,191,255) 100%); /*请更改此行代码,颜色为rgb模式*/background: linear-gradient(to right, rgb(160,32,240) 0%, rgb(0,191,255) 100%);filter: progid:DXImageTransform.Microsoft.gradient( startColorstr='#e0208c', endColorstr='#fa6400',GradientType=1 );/*-webkit-border-radius: 8px;-moz-border-radius: 8px;-o-border-radius: 8px;border-radius: 8px;*/border-radius: var(--main-radius);}.buy-container .buy-box{display: -webkit-box; display: flex; -webkit-box-pack: justify; justify-content: space-between; -webkit-box-align: center; align-items: center; max-width: 900px; margin: 0 auto;}@media screen and (max-width: 700px){.buy-container .buy-box{display: block; text-align: center;}.buy-container .buy-box .slogan{margin-bottom: 30px;}}.buy-container .buy-box .slogan h3{color: #fff;font-size: 26px;margin: 0 0 10px 0;}@media screen and (max-width: 800px){.buy-container .buy-box .slogan h3{font-size: 24px;}}@media screen and (max-width: 500px){.buy-container .buy-box .slogan h3{font-size: 20px;}}@media screen and (max-width: 400px){.buy-container .buy-box .slogan h3{font-size: 18px;}}.buy-container .buy-box .slogan p{color: #fff;font-size: 14px;font-weight: bold;margin: 10px 0;}.buy-container .buy-box .actions{display: -webkit-box; display: flex; -webkit-box-align: center; align-items: center;list-style-type: none;margin: 0;padding: 0;}@media screen and (max-width: 700px){.buy-container .buy-box .actions{-webkit-box-pack: justify; justify-content: center;}}.buy-container .buy-box .actions li{margin: 0;}.buy-container .buy-box .actions li:last-child{margin-left: 10px;}.buy-container .buy-box .actions li a{position: relative;color: #fff !important;font-size: 14px;font-weight: bold; line-height: 1;text-decoration: none;padding: 10px 20px;background-color: rgba(255, 255, 255, .1);-webkit-border-radius: 4px;-moz-border-radius: 4px;-o-border-radius: 4px;border-radius: 4px;-webkit-transition: .2s;-moz-transition: .2s;-o-transition: .2s;transition: .2s;}.buy-container .buy-box .actions li a:hover{-webkit-transform: translateY(-2px);-moz-transform: translateY(-2px);-o-transform: translateY(-2px);transform: translateY(-2px); -webkit-box-shadow: 0 5px 10px 0 rgba(0, 0, 0, .2); -moz-box-shadow: 0 5px 10px 0 rgba(0, 0, 0, .2); -o-box-shadow: 0 5px 10px 0 rgba(0, 0, 0, .2); box-shadow: 0 5px 10px 0 rgba(0, 0, 0, .2);opacity: 1 !important;}@media screen and (max-width: 330px){.buy-container .buy-box .actions li a{font-size: 12px;}}.buy-container .buy-box .actions li a:not(.primary):before{content: "";position: absolute;top: 0;left: 0;width: 100%;height: 100%;-webkit-box-shadow: inset 0 0 0 1px currentColor;-moz-box-shadow: inset 0 0 0 1px currentColor;-o-box-shadow: inset 0 0 0 1px currentColor;box-shadow: inset 0 0 0 1px currentColor;-webkit-border-radius: 4px;-moz-border-radius: 4px;-o-border-radius: 4px;border-radius: 4px;-khtml-opacity: .3;-moz-opacity: .3;opacity: .3;}.buy-container .buy-box .actions li a:after{display: none;}.buy-container .buy-box .actions li a.primary{color: #ff3b30 !important;background-color: #fff;}.buy-container .tips{border-top: 1px solid rgba(255, 255, 255, .1);display: block;color: #fff;font-size: 12px;text-align: center; max-width: 900px;margin: 30px auto 0 auto;padding-top: 30px;}@media screen and (max-width: 768px){.buy-container {padding: 30px 40px 30px 40px;}}#go-fav{width:100%; height:100%; line-height:30px; text-align:center; font-size:14px; font-weight:700; color:rgba(255, 255, 255, 1);}#go-fav span{padding:5px 10px; background:#f0e7e2; border-radius:8px; color:#202020; margin:0 5px;}
</style>
<script>
document.getElementById("wiiuii").parentNode.parentNode.style.padding=0;
</script>7.主题 LOGO 扫光
CSS 代码:
 CSS
CSS/* logo 扫光开始 */
.navbar-brand{position:relative;overflow:hidden;margin: 0px 0 0 0px;}.navbar-brand:before{content:""; position: absolute; left: -665px; top: -460px; width: 200px; height: 15px; background-color: rgba(255,255,255,.5); -webkit-transform: rotate(-45deg); -moz-transform: rotate(-45deg); -ms-transform: rotate(-45deg); -o-transform: rotate(-45deg); transform: rotate(-45deg); -webkit-animation: searchLights 6s ease-in 0s infinite; -o-animation: searchLights 6s ease-in 0s infinite; animation: searchLights 6s ease-in 0s infinite;}@-moz-keyframes searchLights{50%{left: -100px; top: 0;} 65%{left: 120px; top: 100px;}}@keyframes searchLights{40%{left: -100px; top: 0;} 60%{left: 120px; top: 100px;} 80%{left: -100px; top: 0px;}}
/* logo 扫光结束 */8.子比主题添加文件下载提取码中一键复制功能
教程分为两步,添加 css 样式和添加 js 代码即可如下
1.子比主题设置—>自定义代码—>自定义 CSS 样式:,添加以下 CSS 代码:
 CSS
CSS/*
*by:映凡空间/
*子比主题下载页面一键复制提取码功能 css 样式开始
*请本 CSS 代码放置子比主题设置->全局&功能->自定义 CSS 样式中即可
*/
.but-download .badg {
position: relative;
cursor:pointer;
}
.but-download .badg::after {
position: absolute;
content: " ";
width: 0;
height: 0;
top: -11px;
left: 50%;
-webkit-transform: translateX(-50%);
-moz-transform: translateX(-50%);
-ms-transform: translateX(-50%);
-o-transform: translateX(-50%);
transform: translateX(-50%);
border-top: 10px solid rgb(236, 235, 235);
border-left: 5px solid transparent;
border-right: 5px solid transparent;
-webkit-transition: .3s;
-o-transition: .3s;
-moz-transition: .3s;
transition: .3s;
opacity: 0;
}
.but-download .badg::before {
content: attr(data-before);
position: absolute;
width: 100px;
height: 31px;
top: -40px;
left: 50%;
-webkit-transform: translateX(-50%);
-moz-transform: translateX(-50%);
-ms-transform: translateX(-50%);
-o-transform: translateX(-50%);
transform: translateX(-50%);
font-size: 14px;
line-height: 31px;
border-radius: 4px;
color: #6c6a6a;
background-color: rgb(236, 235, 235);
text-align: center;
-webkit-transition: .3s;
-o-transition: .3s;
-moz-transition: .3s;
transition: .3s;
opacity: 0;
}
.but-download .badg:hover::after,
.but-download .badg:hover::before {
opacity: 1;
}
/*
*by:YOY-小站 124.223.87.188/
*子比主题下载页面一键复制提取码功能 css 样式结束
*/
2.子比主题设置—>自定义代码—>自定义 javascript 代码:,添加以下 javascript 代码:
 JavaScript
/*
 *by:映凡空间/
 *子比主题下载页面一键复制提取码功能 JavaScript 代码开始
 *请本 JavaScript 代码放置子比主题设置->全局&功能->自定义 javascript 代码中即可
 */
if(document.querySelectorAll(".but-download .badg")!=undefined){
     const reg = /[a-zA-z0-9]/ig;
    const copy1 = document.querySelectorAll(".but-download .badg");
    for (let i = 0; i < copy1.length; i++) {
      copy1[i].index = i;
      copy1[i].setAttribute("data-before", "点击复制");
      copy1[i].addEventListener("click", copyOperation);
      copy1[i].addEventListener("mouseout", copyOk);
    }

    function copyOperation() {
      var oInput = document.createElement("input");
      let text = this.innerText;
      text = text.match(reg).join("");
      oInput.value = text;
      document.body.appendChild(oInput);
      oInput.select();
      document.execCommand("Copy");
      oInput.className = "oInput";
      oInput.style.display = "none";
      this.setAttribute("data-before", "已复制");
    }
    function copyOk() {
      setTimeout(() => {
        this.setAttribute("data-before", "点击复制");
      }, 300)
    }
}
/*
 *子比主题下载页面一键复制提取码功能 JavaScript 代码结束
 *by:YOY-小站 124.223.87.188/
*/9.网站内添加复制文章内容自动添加博客名称和原文地址
- 1、关于这个网站复制自动添加版权和原文地址的这个功能之前我也有研究过,网站百度也有很多,但是基本上都是失效的,要么能用也只是在文字内复制之后会自动添加,但是代码质量的就不会自动添加,对于如果不懂 javascript 代码的朋友来说是很头疼的,因此社长也研究了优化一版,分享给大家使用。
使用方法:
- 1、将下面的 PHP 代码加入到主题目录下:themes/zibll/header.php文件中,需要注意的是,需要放在<head> 代码放置在这里</head> 代码中间否则没用
- 2、其他主题同理,放置在 header.php 文件中,因为这个是全局引用文件
- 3、自行修改一下,文章来源出自 XXX 博客的文字内容即可
- 4、添加之后去赶快体验一下吧~如果教程有帮到你,可以多推荐推荐
 PHP
PHP<!--复制内容自动添加原文地址开始 by YOY-小站-->
<script type="text/javascript">
function addLink() {
var selection = window.getSelection();
pagelink = "</br></br>. 文章来源出自[ YOY-小站 ] 转载请保留原文链接: " + document.location.href;
copytext = selection + pagelink;
newdiv = document.createElement('div');
newdiv.style.position = 'absolute';
newdiv.style.left = '-99999px';
document.body.appendChild(newdiv);
newdiv.innerHTML = copytext;
selection.selectAllChildren(newdiv);
window.setTimeout(function () {
document.body.removeChild(newdiv);
}, 100);
}
document.oncopy = addLink;
</script>
<!--复制内容自动添加原文地址结束 by YOY-小站-->
10.WP 网站有新文章发布时发送邮件通知所有用户
捣鼓了下WordPress发布文章或更新文章会发邮件通知已注册的用户,已经过测试,用户不想给邮箱打扰可以在消息通知中取消掉文章评论该选项
记得把代码放在主题目录下functions.php文件中
 PHP
PHP//邮件通知
function newPostNotify($post_ID) {
if( wp_is_post_revision($post_ID) ) return;
global $wpdb;
$blogurl = get_bloginfo('url'); //获取首页链接
$get_post_info = get_post($post_ID);
if ( $get_post_info->post_status == 'publish' && $_POST['original_post_status'] != 'publish' ) {
// 读数据库,获取所有用户的email
$wp_user_email = $wpdb->get_results("SELECT DISTINCT * FROM $wpdb->users");
// 依次给每个Email发邮件
foreach ( $wp_user_email as $email ) {
$user_id = $email->ID;
//用户是否接收
if (!zib_msg_is_allow_receive($user_id, 'posts')) {return;}
$fsemail = $email->user_email;
// 邮件标题:博客有新文章
$subject = 'YOY-博客有新文章';
// 邮件内容:新文章网址:+ URL
$message = '您好!'.$email->display_name.'<br>您浏览过的YOY-博客更新了一篇新文章:' . get_permalink($post_ID).'<br><br>如有打扰在<a href="'.$blogurl.'/user" rel="noopener" target="_blank">消息通知</a>中关闭掉文章评论选项即可';
// 发邮件
wp_mail($fsemail, $subject, $message);
}
}
}
add_action('publish_post', 'newPostNotify');11.用户头像呼吸光环+鼠标悬停旋转放大
复制 CSS 代码到后台子比主题设置 —> 自定义 CSS 样式 —> 将 CSS 代码粘贴框里
 CSS
CSS/*头像呼吸光环和鼠标悬停旋转放大开始*/
/*by:织音博客-www.itzhiyin.cn*/
.avatar{border-radius: 50%; animation: light 4s ease-in-out infinite; transition: 0.5s;}.avatar:hover{transform: scale(1.15) rotate(720deg);}@keyframes light{0%{box-shadow: 0 0 4px #f00;} 25%{box-shadow: 0 0 16px #0f0;} 50%{box-shadow: 0 0 4px #00f;} 75%{box-shadow: 0 0 16px #0f0;} 100%{box-shadow: 0 0 4px #f00;}}
/*by:织音博客-www.itzhiyin.cn*/
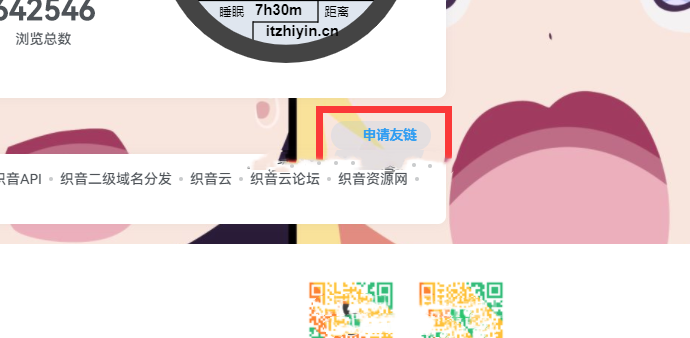
/*头像呼吸光环和鼠标悬停旋转放大结束*/11.友情链接右侧申请按钮动态美化
这个是一个小功能,放在首页底部底部也是很好看的
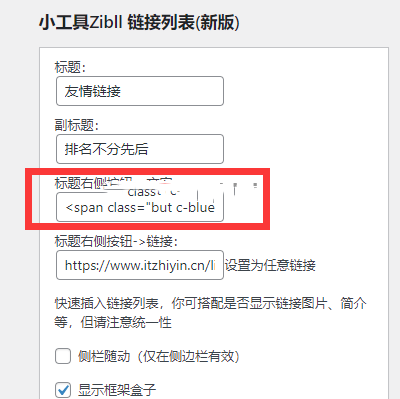
添加方法: 后台设置—>外观—>小工具—>添加 Zibll 链接列表(新版),加到标题右侧按钮即可
 CSS
CSS<span class="but c-blue radius"><svg class="icon fa-spin" aria-hidden="true"><use xlink:href="#icon-fengche1"></use></svg>申请友链
效果图:

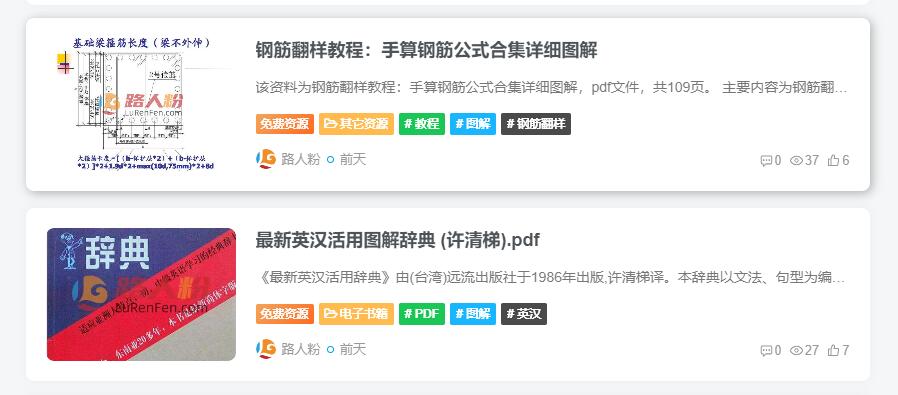
12.鼠标移动到文章列表卡片显示悬浮阴影
效果图:

代码如下:(后台-ZIBLL主题设置-全局功能-自定义代码-自定义css)
 CSS
CSS/*文章列表卡片鼠标移动悬浮效果*/
.posts-item:hover{box-shadow:2px 2px 12px rgba(0,0,0,0.3);
-webkit-transform:translate(0,-2px);
-ms-transform:translate(0,-2px);
-o-transform:translate(0,-2px);
transform:translate(0,-2px);
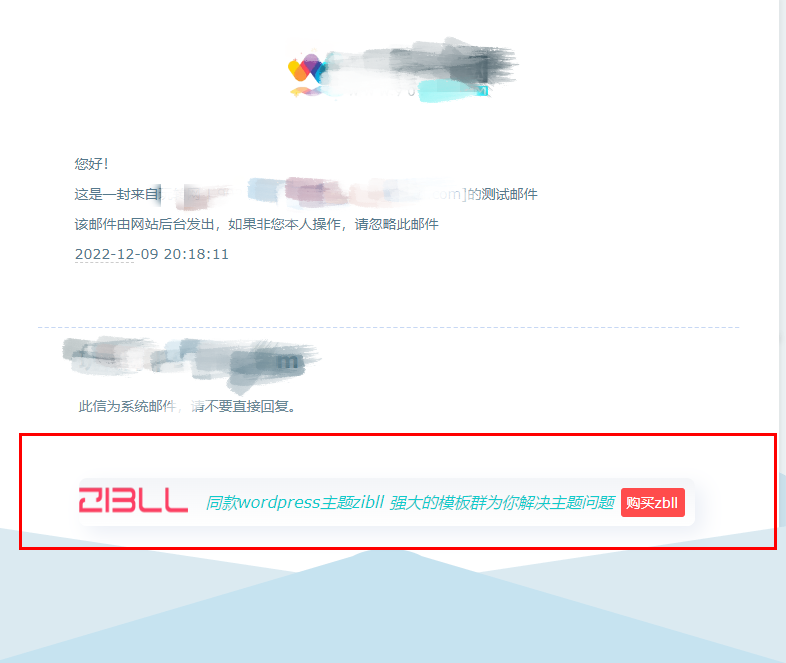
}13.邮件页面插入一个html广告代码
效果图:

代码:
 CSS
CSS<div style="
margin: 23px 0px 10px;
height: 48px;
position: relative;
border-radius: 8px;
box-shadow: 8px 8px 20px 0 rgb(55 99 170 / 10%), -8px -8px 20px 0 #fff;
background-image: linear-gradient(0deg,#fff,#f3f5f8);">
<img src="https://static.902d.com/img/zbll.png" title="OKEX" style="
float: left;
width: 111px;
height: 46px;"> <a href="https://www.zixinshi.com/join/2205450" target="_blank" rel="noopener"title="okex" style="
overflow: hidden;
padding: 0 103px 0 16px;
position: relative;
display: block;
overflow: hidden;
text-decoration: none;">
<em style="
animation: fadenum 10s infinite;
font-size: 16px;
color: #0ecbcb;
display: block;
line-height: 48px;
height: 48px;
text-overflow: ellipsis;
white-space: nowrap;">
同款wordpress主题zibll 强大的模板群为你解决主题问题
</em><span style="
font-size: 18px;
background: #333;
width: 64px;
height: 29px;
background: #ff4c4c;
color: #fff;
line-height: 29px;
text-align: center;
position: absolute;
right: 10px;
top: 10px;
border-radius: 3px;
font-size: 14px;">购买zbll</span></a></div>常见问题FAQ
- 免费下载或者VIP会员专享资源能否直接商用?
- 本站所有资源版权均属于原作者所有,这里所提供资源均只能用于参考学习用,请勿直接商用。若由于商用引起版权纠纷,一切责任均由使用者承担。更多说明请参考 VIP介绍。


